Microsoft SQL Server
Smartsign Server and its subcomponents use Microsoft SQL Server (MSSQL) as their database engine.
You can install MSSQL locally on the same server, connect to it on another server or use Azure SQL if you are running your server in Azure.
- Database connection is established using both TCP/IP and Named pipes.
- Only SQL Authentication is supported.
Regardless of which option you select, we recommend installing Microsoft SQL Management Studio on the Smartsign Server for easy access to the databases if needed.
You'll need to prepare the following information to complete the Smartsign Server installation.
- MSSQL Server address
- MSSQL Server instance name or port (if required to connect)
- Database username
- Database password
MSSQL Server address
Examples, assuming locally installed MSSQL:
"localhost" (recommended)
"localhost\SQLEXPRESS" (named instance)
"localhost,1433" (custom port)
Note that named instance and port are mutually exclusive.
MSSQL Server port
The traditional port for MSSQL is 1433, but later versions commonly select a random port. You can either choose to change the port to 1433 or use the port that MSSQL selected for you. If you are running MSSQL Server Express you can use this command in Powershell to find the port.
(Get-ItemProperty "HKLM:\SOFTWARE\Microsoft\Microsoft SQL Server\SQLEXPRESS\MSSQLServer\SuperSocketNetLib\Tcp").TcpPort
MSSQL Communication settings
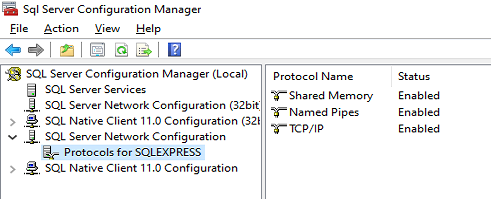
Use SQL Server Configuration Manager to configure communication for your MSSQL Server instance. Any changes made will require a restart of the SQL Server service before it's activated.
We recommend enabling both TCP/IP and Named Pipes. If you want
to change the port used by MSSQL, you can do so by viewing the
properties on TCP/IP and selecting the IP Addresses tab.

Database username and password
You should create a dedicated database user for Smartsign with permission to create databases. The below steps shows how to do it using SQL Management Studio.
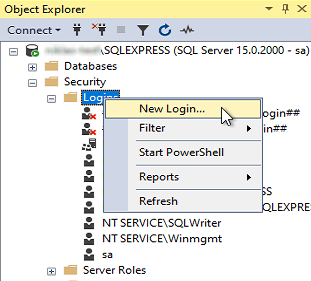
- Create a new SQL Login with password, expand Security,
right-click on Logins and select New Login...

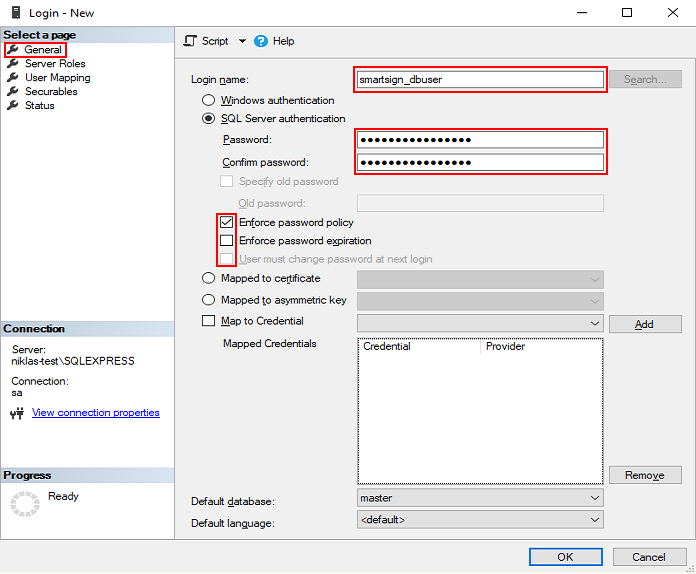
- Provide a username, password and select password options

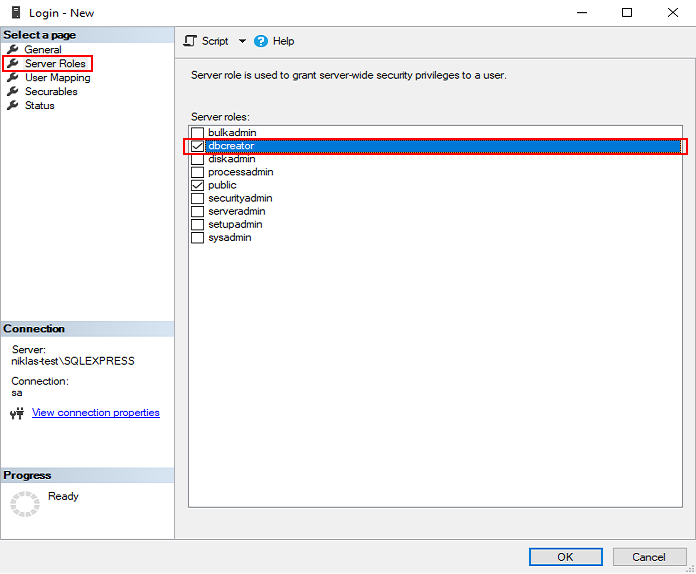
- Add the server role dbcreator

- Finish by clicking OK
Database collation
The recommended collation is: SQL_Latin1_General_CP1_CI_AS